Pages

Sunday, July 31, 2011

Sewing Machines - Starting to Follow Reviews

Conveniently for me, there's a discussion going on about sewing machines right now at Ellison Lane Quilts and this comment caught my eye, seconded by another commenter ...
I would not buy a low end Singer - having done it myself. Because if your friends ever want to start quilting then this will only frustrate them. The dogs are spaced too far apart for picking up the fabric for 1/4" seams as well as too far back to sew right from the edge. It just isn't versatile enough to do different types of sewing. So I would avoid at all costs and think a better, older machine second hand would serve them much better. 
 Maybe that's why I struggled with my quarter inch seams. I see a lot of Janomes and Berninas recommended in the comments. I'm surprised not to see a Pfaff recommended because I've seen several reports of people very happy with their Pfaffs.

I think I'll have to spend a day sometime just trying out various brands and models. I'm glad I have this experience with my low-end Singer, though, so I'll at least have something to compare.
Share/Bookmark

I Married a Hobbit

You haven't seen tan lines until you've seen Kevin's! Okay, there's also a little surface dirt after weeding the garden, but mostly this is from wearing his sandals year after year. His feet look like this in the winter, too, just less so.

While I was sewing this afternoon, Kevin was weeding. He weeded until he was dizzy ... from the heat. It was very hot today. I can't believe his feet! He should wear sandals with a fish shaped strap across the front if he's so keen on getting tan lines. They might as well be a conversation piece. What am I saying? They're already a conversation piece. Obviously.

I had a slow start to my day because I had such bad ankle cramps last night starting around midnight. I didn't get to sleep until sometime after 4:30 a.m. and then they started again at 11:30 a.m. and went on for an hour or two. It's always my right ankle when I get these and they're worse than any I've had in my feet or legs. They would start every time I would lie down last night and once started, I would HAVE to stand up. The cramps were so strong, they twisted my foot to the side so that I couldn't put my foot flat on the floor until the cramp had subsided a little. I also couldn't feel my foot, which was very strange. Parts of me feet are still a bit numbed as a result of nerve damage from the chemo but they're not entirely without feeling. I can, for instance, typically feel that my feet are on the floor. When I was having these ankle cramps, I couldn't feel my feet at all while the cramps were at their strongest. While I haven't had a cramp since about noon, my ankle area aches a bit from where the worst of the cramping was. What a miserable night. If today had been a work day, I wouldn't have made it. As it is, I didn't get started on my quilt until after 1:00. I'm so glad to have the top finished. Isn't it pretty?!!

Don and Syl had us over for dinner tonight. Lots of fresh garden vegetables. Mmmm ... and angelfood cake with fresh from the backyard raspberries. Mmmm ... And a nice visit, too, with Uncle Reg and Marion.

I'm suddenly seeing the inside of my house with non-quilting eyes and it ain't pretty! It's pretty nasty to tell you the truth. I'd hate to have to start handing out hazmat suits to visitors before they walk through the door. So you know what I'll be doing tomorrow.
Posted by Picasa

Share/Bookmark

Quilt Top DONE!

YEAH! I made a plan and executed it. It took longer than I thought it would and it was trickier than I thought it would be. I learned a lot.

The wonkiness of the right side doesn't look too glaring in the photo, does it? Of course, I still might resew the one seam of the bottom border where there's that little tuck. You can see that I left some border fabric tags there just in case.

I'm so happy to have it done despite it's homespun charm factor. I'm very pleased with the colours and the fabrics. Now to choose some fabric for the back. I'm going to look for an all-over print in one of these fabrics or a coordinating fabric. I'll need quite a bit so something on sale will be ideal. And I also need to select binding fabric. I think I have enough of the green and I think it would look good for the border. Either that or pull out the little bit of pink/red/coral colours. Decisions. Decisions.

Tomorrow. I do a WHOLE LOT of house cleaning. Our boy comes home on Tuesday! For two whole weeks before he goes back to Louisville for his 4th year. It will be SO NICE to have him home for a while.
Posted by Picasa

Share/Bookmark

Sewing OOPS!

My last seam. Natch! About mid seam I wondered where the bit of fabric I needed to ease in had gone. I suspected I'd accidentally made a tuck but I couldn't find one. I found it while I was pressing. Just a little one. Hmmmm ... Do I leave it and consider it part of my quilt's "charm" ... haha ... or do I redo that seam. I haven't decided. Let me step away from the quilt for a bit first. I think I'll redo it. I didn't cut the tag end off my border quite yet so I still have the option.


Posted by Picasa

Share/Bookmark

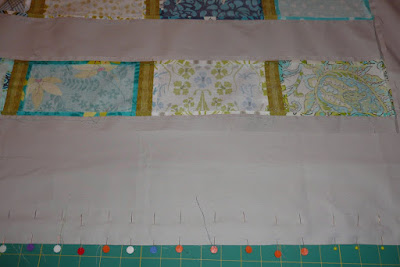
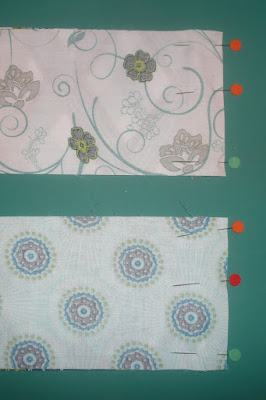
Wrong Way. Right Way.

Today I've been sewing the borders on my quilt. The two long sides went smoothly. Better than I had anticipated. Yeah!

Then I had the top and bottom borders to do. I got one whole border strip pinned on and was about to sew when I caught myself. And good thing I did before I started sewing. I'd broken a cardinal rule of "right side to right side (unless otherwise indicated). So I unpinned the whole thing ... a copious number of pins ... and redid it ... right side to right side.

Sheeesh! A seam ripping episode averted.
Posted by Picasa

Share/Bookmark

Saturday, July 30, 2011

Another Quilt Making Hurdle Stumbled Over

Another step completed in my quilt project. I've really had to let go of any notion of perfection, I tell you!

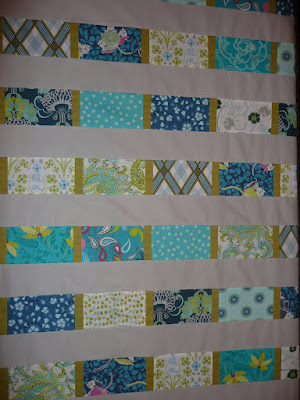
So here is the pieced top. All that's left to complete the top is to attach the borders, which will frame the pieced section in wider strips of grey. I'll do that tomorrow. Then, at some later date, I'll choose fabric for the back, use some of the fabric leftovers from the front to embellish the back a bit, then take the whole thing to a long-arm quilter to finish. I may or may not put the binding on this one myself. Right now I'm too exhausted to even think about it!

Here's what didn't quite go as I had hoped:
  1. The green strips run match up pretty nicely at the left of the quilt but as the eye moves to the right, they get increasingly out of alignment. By the time you're looking at the right side, they really aren't in very good alignment at all. My bad? Or my machine's bad? Or maybe a bit of both? I'll be able to answer that question myself after I try sewing on a new machine, but that won't be for a while. But I can tell you that I won't even THINK about trying anything with matching seams until either me or the machine situation is fixed.
  2. It's not just the green bars that are out of alignment on the right side. The whole edge is a bit wonky. I think it's going to overall just look a little weird on that side of the quilt. I'm not getting too worked up about it, though. This is, after all, a beginner experience. A learning experience. And even if it's a bit wonky, it will serve the purpose of keeping someone warm. And the fabrics will still be pretty. And someone will love it, despite or even because of it's wonkiness. Or because I made it. So all's not lost. It could be worse. After I carefully repressed all the seams and then pressed the front and folded it to see how out of whack it was, it wasnt's badly unsquared, which surprises me. *shrug* We'll see what happens when I sew the borders on tomorrow.
See how the green bars to the left are more aligned than the ones on the right?

Here's a better photo showing how things line up quite nicely on the left side of the quilt.

Here's a photo that shows clearly how wonky things get on the right side of the quilt.

General lessons learned:
  1. Precision cutting of fabric is a MUST.
  2. Precision quarter inch seams are a MUST.
  3. When your machine is skipping stitches, try replacing the needle ... again ... and again.
  4. I definitely want ... no, NEED ... a new sewing machine.
  5. Making quilts is hard on my back. If I keep at this, I will need a better, more ergonomic work space.
  6. I'm going to join the Quilter's Guild this fall.
  7. I hope to take some quilting classes, one of which I hope will be free motion quilting (to be done on my NEW machine).
  8. Ironing brings on hot flashes.
  9. Quilting causes a messy house. Guess what I'll be doing a lot of after I get the borders on this quilt?
  10. Making quilts is a challenging and frustrating but rewarding endeavour.
  11. If I'm going to make quilts for everyone I love, I have a lot of quilting to do. Pitty patter ...
Posted by Picasa

Share/Bookmark

A Garden Interlude


Posted by Picasa

Share/Bookmark

The Charm of Imperfection

Today Lynn at Sew and Home resolved my "skipped stitches" issue. She suggested I try a Schmetz No. 12 instead of the Singer No. 11 that I'd been using. In fairness to Singer Needles, it was a old unused Singer needle I had been using and while I can't imagine that "old" would make a difference in needles when it was unused, I bought some new Singer needles just in case. I haven't tried them and won't as long as the Schmetz is working like a charm. And it is. Not a single skipped stitch! Amazing! This is a good thing to learn.

So, this afternoon I've completed the next step of row sewing with mixed results. My first strip went quite out of alignment meaning the green strips got further out of alignment as I went. I carefully pinned the whole strip but  right away the fabric started bunching up as I approached a pin and I didn't seem able to "ease" the fabric. What a struggle. I was very disappointed with my first strip. In retrospect, I will also bet that since it contains the first pieces I sewed, perhaps my quarter inch seams weren't as good in the beginning. One can't expect to match up already imperfect sewing - or cutting, for that matter, though I know my cutting was good. I will look more closely at that strip to see if it's worth resewing any of it. I can tell you that my Mom would have each green strip lined up PERFECTLY. There would be no wonkiness allowed. None whatsoever. I am not my Mom. Obviously, though people say we're the spitting image. I have so much less patience for picking out seams and I'm a certainly more willing to accept the "charm of imperfection". *grin*

Things did get better with my next set of strips. While not Mom perfect, they are more matchy matchy. I learned to stretch the pieced strip a bit as I pinned it to the grey strip. This helped a bit (though I'm not sure it would have helped with the first strips I sewed anyway). I also learned to hold the grey fabric a little more firmly while sewing, though this might prove to be a bad idea in the long run. I worry that it will make my strips a bit wavy, which might throw my overall quilt top off a bit. We'll see. This is a beginner "learn to quilt" experience, after all.

I also learned that I can sew both on the left and the right of my needle. I don't know if everyone does that but when I realized that I had used poor judgment in not leaving extra "dog ears" of sashing at BOTH ends of my strips, I could really only start sewing from one end - the end where there was no wiggle room - and since I want to have my pieced strip on top so I can make sure my seams get sewn flat, the only way to do that was to sew backwards from what I'd been doing earlier. I made a new quarter inch line with tape on the other side of the needle and sewed all my strips this go round like that. Either everyone is adept at this or my little bits of ambidexterity turned out to be useful, though I still prefer sewing on the other side of the needle.

On to sewing the ever widening strips together. Cross your fingers for me. I fear that things are at risk of going wonkier on me as I go.
Posted by Picasa

Share/Bookmark

Finally! ReRoofed!

Yesterday the roofers came to finish their work. We finally have new cedar shingles on the front of our house. They're rich brown right now but will soon turn to a beautiful grey that will better match our house. The smell of the cedar is lovely, especially after a rain. And now, with them on the roof just outside our bedroom window, I'll smell cedar in the night. Lovely.
Posted by Picasa

Share/Bookmark

Pretty Roses

... compliments of Sylvia and The Nosegay. They are SO pretty and are lasting beautifully.

Posted by Picasa

Share/Bookmark

This Quilt Thing Is Getting Trickier

Yesterday was a day off quilting. I spent the day with Elaine. We haven't spent time together for about a year! Long overdue! We went for lunch at McNally Robinson and spent about an hour in the children's book section, visited the Mendel Art Gallery and sat on the rooftop of the Yard and Flagon on Broadway for a while. It was lovely! Elaine is the only (adult) person I know who would happily spend a day in a children's book department. Many years ago we used to give each other a children's book per month and we each built up a nice little collection. Elaine worked in the children's department of the public library for several years so her collection soon outgrew mine. It was so fantastic to look at children's books together and admire some of the new stories and illustrators.

Last night Kevin and I went for dinner with Lynne to celebrate her retirement. Today was her last day! Exciting ... and a little scary!

Today I got back to quilting. First I had to press open all the seams on my strips of fabric. Done. My quarter inch is not very accurate, I'm sorry to say. This despite the care I took to be precise both in cutting and sewing. I'm so glad I chose a pattern where this shouldn't be a big issue. The question is, "Would a new machine make a difference or is it just me"?

I spent a lot of time cutting the sashing (the solid coloured strips that go between the print strips) and borders for the quilt. It was a little more complicated than I had expected because of the length of the strips. The sashings are 56" long and the longest borders are 87". My cutting matt is 35" long and my ruler is 26" long. This meant folding the fabric into multiple layers. And doing math ... again and again ... to make sure I didn't screw up the cutting. Oy oy oy! So I got them all cut and somehow ended up just a smidge short on fabric so I ended up piecing one of the sashings. Just one little seam. No biggie. I doubt anyone will even notice it after the whole things is quilted and fluffed. It is a PIECED quilt, after all.

So then I sewed a sashing strip to each of the print strips. I followed the instructions at Stitched in Color and used my "walking foot", which I've never used before. Sounds easy enough. All in all, it went quite well but I did make a couple of mess ups that I had to take some time to fix. I'm also not sure what difference the walking foot makes. I didn't notice any particular benefit.

Another frustration today is that my machine continues to skip stitches. This despite putting in 2 new needles over the past 3 days. I'm going to buy more needles tomorrow and see if another new needle makes a difference. If that doesn't solve the problem, I'll have to take my machine back to the technician who serviced it and see if he can solve the problem. I'm not going to sew any more seams if it continues to skip stitches (after I try another new needle). This means I might not be able to finish my quilt top this weekend, which would be very disappointing.

While I was pressing seams I noticed such a gap in one that I had to hand stitch it together. I've also resewn several seams. Stuff like that takes all the fun out of sewing, I think. A new sewing machine is definitely on my wish list. Right at the top, in fact.

Lessons learned today:
  1. Make sure you leave a little extra length on your sashing and border strips so you have a little wiggle room. I did think of this (pat on the back to me) but I still made a little misjudgment. I had to take apart one of my long seams (note to self - get a seam ripper) because I started sewing from the wrong end (the end with the overhang because it oriented to my machine better) and even though I had pinned the whole strip the fabric shifted as I sewed and I ended up a half inch short of sashing on one end while the other end (where I started) had a big dog ear of sashing hanging off it. Rats! After that I remembered to leave the overhang of sashing at the finish instead of the start (DUH!). The amount of shift when I sew the strips together is alarming! As much as an inch sometimes even though I've pinned the trips together carefully. It must be because the pieced strips have a little more give in them even after they've been pressed than the plain strips. All I can say is good thing I didn't need to match seams! What would I do if I had to match seams? These are questions I have for an experienced quilter.
  2. Remember to PRESS instead of IRON. I instinctively IRON so I've tried to be very careful to PRESS instead so as not to unduly stretch and distort the fabric. When the whole quilt top is finished, then I'll give it a more thorough ironing.
And ... I had a laugh when I was sewing today. Remember that single little greenish piece that disappeared on me? Well, I found it today when I was pressing open seams and noticed a double one. I can't believe I didn't notice it while sewing! So there it is, a little doubled piece right there in the middle of the quilt ... where it will stay.

Here is my stack of strips, ready to be sewn together. I'm a little nervous about this next step. Even though I don't have to match seams precisely, I do want the green ones to line up properly and I'm less and less certain that this is possible. Maybe I need to sew the joining seams by starting in the centre and then sewing out to each side ... instead of just starting at one end and sewing to the other. If anyone out there knows if this is a good idea, please let me know.

And now ... to bed. I'm exhausted!

Posted by Picasa

Share/Bookmark

Thursday, July 28, 2011

Look Ma! Pins!

Quilting progress! I finished all 12 strips for my quilt top today! I had a few minor setbacks. One being my morning machine problem and then, just when I was moving along quite nicely in the afternoon my machine started skipping stitches. Thanks, Mom, for teaching by example. I remembered to check the underside of my stitching regularly to make sure it looked as good as the top. I only had to restitch a few seams after the problem was resolved. A phone call to the shop and Lynn's suggestion that I switch to a new sewing machine needle solved the problem. If my machine hadn't just been fitted with a new needle, I might have thought of trying that myself but, apparently, new needles can sometimes be duds. Lesson learned.

Other distractions were the crew of workers that were crawling all over our roof today. They finally came to finish the shingling - cedar shakes at the front and some asphalt shingles at the back of the house. The main part of the house was reshingled a few years ago. Of course, as they got going, they uncovered a few more wasp nests and had to take care of those before they could continue! Yikes! There was so much hammering that one of my framed handkerchiefs fell off the wall taking a dining room lamp with it. Amazingly, nothing broke! I took the rest of the framed handkerchiefs off the wall for the time being. Didn't want to press my luck. The cedar shakes sure look nice on the house. I'll like them even better when they've greyed. The work crew were listening to music that took me back. A little Pink Floyd Dark Side of the Moon and Black Sabbath Paranoid. Ahhhh ... the memories. Not that I was such a rocker when I was a pre-teen but those were two of the first albums I ever bought myself ... along with Donny Osmond's Greatest Hits and The Partridge Family I Think I Love You. I had diverse tastes. What can I say. I still do it seems.

The other unexpected interruption to quilting has been some back pain. What's with that?! Aside from a little bit of back pain during and after pregnancy, I've never had back pain. This is mostly in my upper back. It started bothering me during my marathon weekend of rotary cutting all the fabric for two quilts. Too much standing and leaning over the dining room table probably ... and concentrating and cutting. And now sitting at the sewing machine ... also at the dining room table ... is bothering my back, too. Annoying. It might help if I were to use a better chair and a lower table. I've had to take several breaks during the day to ease my back.

I had hoped to get all the seams of my strips pressed tonight but that will have to wait. I'll bet standing over an iron pressing little seams would only aggravate an already irritated back. I chose to take a break this evening and go with Kevin and his parents to see the building (the new SARCAN processing plant) that has been absorbing Kevin's life for the past year. Once the building is finished sometime in August, hopefully, then there will be the challenge of moving all the machinery from the old processing plant to this one. A big job. I thought my organizing and managing a successful move out and back in of my library so that the flooring could be replaced while keeping all the books and shelves in the right order was remarkable. Let me tell you, it was NOTHING compared to the thought and organization that has gone into the design and management of this building, all done by Kevin. I'm very proud of him.

What I've learned on this leg of my solo quilting journey:
  1. It's awfully nice to think about quilting and not think about cancer.
  2. It's good to regularly check the underside of your seams to make sure your stitches are good.
  3. Having a photo map of your quilt layout is even more important than I had initially realized. I referred to my photo all day and it saved me a lot of time and headache. I was so careful when I stacked my rectangles in the correct order and yet, somehow, one of them ended up out of place and later two whole rows got switched. If not for my photo, I wouldn't have caught that. And once I got sewing sets of twos together, things easily got muddled and the photo was so useful.
  4. Having two pincushions has been a treat. One by my machine and one where I lay the fabrics out. As one empties and one fills, I just switch them around. I like it. While I didn't need pins when sewing the rectangles to the little greenish pieces, I did find I needed them when completing the strips. So there, Mom. I pinned!
  5. It helps to use a pin or a little pointy thing to hold the fabric together at the end of a seam. Either it's my machine that wants to pull one of the fabrics to the side near the end of a seam or all machines do that and you just have to learn to control it. It's probably something experienced sewists don't have any trouble with at all even if they are using less than stellar machines.
  6. For convenience when doing a big sewing project, wind a few bobbins so you've got some on stand by. I'm over half way through my 2nd bobbin and I have a lot more sewing to do.
  7. Assume crazy things will happen. One of my little greenish pieces went missing. I have no idea where it could have gone and I know I cut it. The way I cut I could only end up with an even number of them and so how I ended up with an uneven number ... short by one ... I have no idea. I did some looking around but gave up and just cut a new one. It disappeared like some sock in the wash ... into the "hozone" (haha). A mystery.
  8. Relax your shoulders when cutting and sewing and try to set up things more ergonomically for your back's sake.
  9. And ... very important ... it is so nice to have the support and help of more experienced quilters --- quilters right here in my community and quilters I've never met but who voluntarily connect from out there in the blogosphere --- all who take the time to encourage a beginner such as me. They've been most helpful. That's you Nora, Susan, and the helpful folk at Periwinkle Quilts. And thanks Laurel, too, for your encouraging comments. I know you sew ... or you used to. If you're interested, we could do a quilting bee together some time.  
And now to bed to dream quilt designs.
Posted by Picasa

Share/Bookmark

Wednesday, July 27, 2011

Look Ma! No Pins!

I'm sewing! With my machine! Wonder of wonders!

So last night I got my machine out and onto the table. I sat down and read the manual. I was too tired last night to launch into it and thought best to wait until morning when my brain and cognitive skills are a little fresher.

So this morning I get a bobbin wound. Easy. Threading the machine is easy, too. Installing the bobbin seems easy enough. The methodology is also coming back to my physical memory a little bit, too. I grew up with a Mom who sewed everything, after all. I had a little trouble getting the bobbin thread to come to the surface but after a few tries, it came up. I grabbed a couple of butt ugly fabric pieces (okay, there are no ugly fabric pieces, just unimaginative sewists), cut them into precisely cut strips and started sewing. Not so fast, pardner. Within a few inches my machine came to an abrupt stop (good thing I wasn't really going very fast) and I found a tangled ball of thread on the underside. Natch! To untangle the mess I had to remove the bobbin case and then I appeared to be screwed. I couldn't seem to get it fitted back into place properly or if I was doing it right, I couldn't really tell. Much frustration. Good thing I didn't attempt this last night.

So, off to Sew and Home where I had just had my machine serviced. By the way, I have used this machine before without any such problem, so it can't be JUST me. Can it? Fortunately, Eric, the sewing machine maintenance guy was there and he and Lynn were MOST helpful. It turns out that I was using the wrong kind of Singer bobbin. I needed a plastic one instead of a metal one. The plastic ones are a little shallower and a slightly different shape. Who knew? I can't find anything in my manual specifying the type of bobbin one should be using so I had just grabbed an empty one from my sewing kit. Maybe it was empty for a reason.

I've also learned that there isn't really a proper quarter inch foot for my machine, which is a bit of a bummer. I've heard they're quite helpful at ensuring a quarter inch seam, which is the be all and end all in quilting or so I'm told. I can appreciate that accuracy is tantamount when matching seams and points. Fortunately, I chose a pattern that doesn't require any serious matching so I can afford a little inaccuracy. Still, I want to try a project with matching seams sometime soon so I might as well work toward accuracy.

Anyway, machine problems were resolved by noon and by 1:00 I had chain pieced two whole rows! Ten to go! I've never chain pieced before and I must say I like it! I think my seams are quite good. I used the chain piecing tutorial so kindly provided by Rachel Hauser who blogs about quilting at Stiched in Color. It's one of a series of tutorials she prepared for quilting beginners and they're very good, I think. The series is included with a Beginner Quilt-A-Long for a brick style quilt pattern that is very nice ... one I might try with some of my leftover rectangles and other scraps. It's very much like the one I'm making except that the rows are off set.

I very bravely didn't use any pins. I'm only sewing 4.5 inch lengths so I didn't feel the extra fuss was necessary. I think I did just fine without pins! I'll need them for the longer sashing that will separate the rows so I haven't given up entirely on them, Mom.

And now ... back to chain piecing!
Posted by Picasa

Share/Bookmark

Tuesday, July 26, 2011

Quilt Number 1 - Final Layout

Well, at least I think it's the final layout. After cutting the extra rectangles I needed last night, I laid them out on our bed today so I could see everything better. I only put four of the greenish divider pieces on for effect. Me likey.

What I learned up to now:
  1. Measure twice. Cut once.
  2. It's important to have a sharp blade in your rotary cutter. For my blade, a maximum of two quilts per blade might be about right. Three is too many. I had to replace the blade today before I could finish my cutting. I had some trouble with "fabric tug" last night while cutting and I knew right away that I had to have a new blade before I could cut any more. I had been using the same blade I'd used for Josh and Noelene's quilt, which was new at the time.
  3. Directional fabrics. They require consideration. For the most part it doesn't really matter (to me) in this quilt which direction the fabrics went. There are a couple of exceptions. One is the diamond fabric. I needed one extra piece and I had enough fabric for it but only if I cut it sideways. I could have picked up another fat quarter of it when I was at the store this morning but I decided I would leave the one wonky one in the upper right corner. The one at the bottom of this photo ... the one that looks sideways ... I already switched out for an upright one so I'll just have the one wonky one. I feel rather affectionate toward it, so it stays. My snail fabric, of which I have 4 rectangles, should have been cut the other way. The snails are running vertical instead of horizontal. I could have cut these differently if I'd thought of it. They're so small, most people won't even notice that they're snails and besides, I've rationalized that snails in Kevin's aquariums crawl up the glass so vertical is, perhaps, perfectly correct. I have one blue square with a dandelion on it growing sideways but because it was a scrap piece, I had no choice. And I'm okay with it. Still, I learned to think about directional fabrics. Good lesson.
  4. Spray starch is your friend. My snail fabric is not a typical quilting cotton. It's a cotton gauze ... a Heather Ross fabric ... the same as several in the Far Far Away quilt I've also cut the pieces for. The gauze is quite shifty and I'd read on someone's blog that they recommended starching that fabric to make it a little more stable. I bought some of the "expensive" spray starch and it worked very nicely and didn't smell toxic. I've read that you can make your own starch but I'm just not going to go there.
  5. Take a photo of the quilt layout. If things get muddled, despite your most careful stacking and labeling, you can refer to your photo/map.
I'm sure I'll have more lessons to learn as I continue with my mission. Tonight ... or maybe tomorrow ... I start sewing these strips together with the little bits of greenish fabric between each piece. I'm ramping up for the challenge of machine work. I'll start with the mystery of threading and winding a bobbin. Don't laugh. I've forgotten how to do that stuff. It's been a while and I've lost a few brain cells since. I made sure I bought recommended thread for piecing in a neutral grey for this quilt. I wanted to give my machine the best possible chance to work properly and trouble-free, hence the desire for low-lint, good quality thread, a new needle, a new quarter-inch foot, and a general maintenance check and lube job at the shop.This machine should be in prime operating condition.

Let's cross our fingers.
Posted by Picasa

Share/Bookmark